Share "How to Paint Brick"
Brick can be a lovely look in your home, but exposed, raw brick isn’t always the best choice for your decorative vision. Knowing how to paint brick can let you transform any classic brick surface into the color of your dreams.
Brick in Your Home
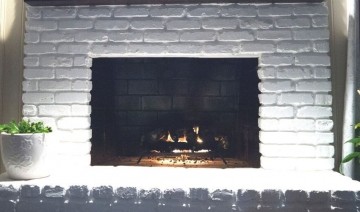
Brick is a classic exterior home finish, but can also be a rustic and charming interior accent. An exposed brick wall can be a fine focal point, while a brick mantle or chimney adds old world elegance to a family space. Brick can make a rustic arch, serve as a fine choice for a kitchen backsplash, or provide sturdy support to shelving. The brick in your home may be original to the structure as new rooms and spaces have been added and enclosed, or it could be a more recent addition. Whatever its origin, however, you can easily paint brick to update its look and add your own flair to the space.
Can Your Brick Be Painted?
It is important to assess the condition of your brick before deciding to paint the surface. Brand new brick should not be painted for at least a year, in order for the brick to settle and age well. Older brick can more easily be painted, but if it is already heavily chipped and damaged, the brick will likely continue to deteriorate beneath a new coat of paint and will need touchups in years to come.
Exterior brick can also be painted, but consider the consequences carefully. Brick is formulated to breath, and painting over an exterior brick surface will lock in any moisture, mold, or pests that may have invaded the brick or mortar already. During freeze and thaw cycles as the seasons change, this could lead to more extensive damage over time.
Should you later decide you don’t like the look of painted brick after all, it can be very challenging to remove a layer of paint. Extensive chemical use will be necessary, and the underlying brick could become even more damaged during the removal process. Consider this carefully when deciding to paint brick, to be sure you are making the right choice for the look you want to achieve.
Finally, when you’re ready to paint brick, consider the size of the job before beginning. Smaller jobs can be easy to accomplish on your own, perhaps with just a few tool rentals to make the job smoother. If you plan to repaint a larger surface or the entire exterior of your home, however, consider hiring professionals to do the job quickly and efficiently, with the expertise to handle any unforeseen complications.
Steps to Paint Brick
Patience is essential when painting brick, and it is important not to skip steps or rush the process or else the results will not look as flawless.
- Protect the Area – Before beginning, use drop cloths, plastic covers, tape, newspapers, and other supplies to protect the surrounding area. Remove any items that can be moved, including artwork, area rugs, and decorative objects to keep them from being damaged during the painting project.
- Clean the Brick – Both interior and exterior brick can accumulate a layer of dust, dirt, mold, salt residue, and other debris that needs to be removed before painting begins so the paint will adhere to the brick more firmly. Use appropriate cleaners depending on the type of buildup, and scrub the surface carefully for a through clean.
- Wait for the Brick to Dry – After cleaning, allow the brick to dry for at least 24-48 hours. Because brick is porous, it will easily absorb moisture and needs time to dry thoroughly or the paint will not bond well with the surface. Increasing air circulation by turning on a ceiling fan or using freestanding fans can help the brick dry more quickly.
- Make Necessary Repairs – If the brick or mortar has any small cracks, seal them with paintable caulk, and allow the caulk to dry thoroughly before proceeding. More extensive damage or complete individual brick replacements may require professional repair for the best results.
- Apply Primer – Choose a primer specifically formulated for use on brick and masonry. Apply an even coat, ensuring that the entire surface is covered, including nooks and crannies. Ideally, apply several primer coats to guarantee full coverage over the porous brick, and allow each coat to dry before applying the next.
- Wait for the Primer to Dry – For the best paint adherence, the primer needs to be completely dry before painting. Just as with waiting after initially cleaning the brick, improving air circulation will help the primer dry more quickly.
- Choose Appropriate Paint – When painting brick, you should choose not only the color you want, but also the best type of paint for the rough surface. Elastodynamic paint is an excellent choice for covering brick, as the paint has greater elasticity to cover small gaps and spaces that are natural in the brick. Acrylic latex paint is another good choice, and gloss or semi-gloss finishes are often preferred because they will highlight the detail of the brick’s texture in any color, plus they are easier to keep clean.
- Apply the Paint – A paint sprayer is the best option for covering large brick surfaces because it will apply the paint evenly. If the project is smaller, a roller with a thick nap is ideal for getting into the nooks and crannies of the brick for thorough coverage. After the first coat of paint dries, consider a second coat if needed.
- Allow the Paint to Dry – Give the fresh paint several days to dry thoroughly and begin curing before redecorating the space and replacing artwork and other accents. This will protect other items from paint residue and will help the odor of fresh paint dissipate more easily.
Painting brick can be a satisfying way to update a rustic space without losing the charming texture and dimension that brick provides. By knowing how to paint brick, you can easily refresh your space and give your brick a new, colorful life.